How to set calendar view and activity name settings?
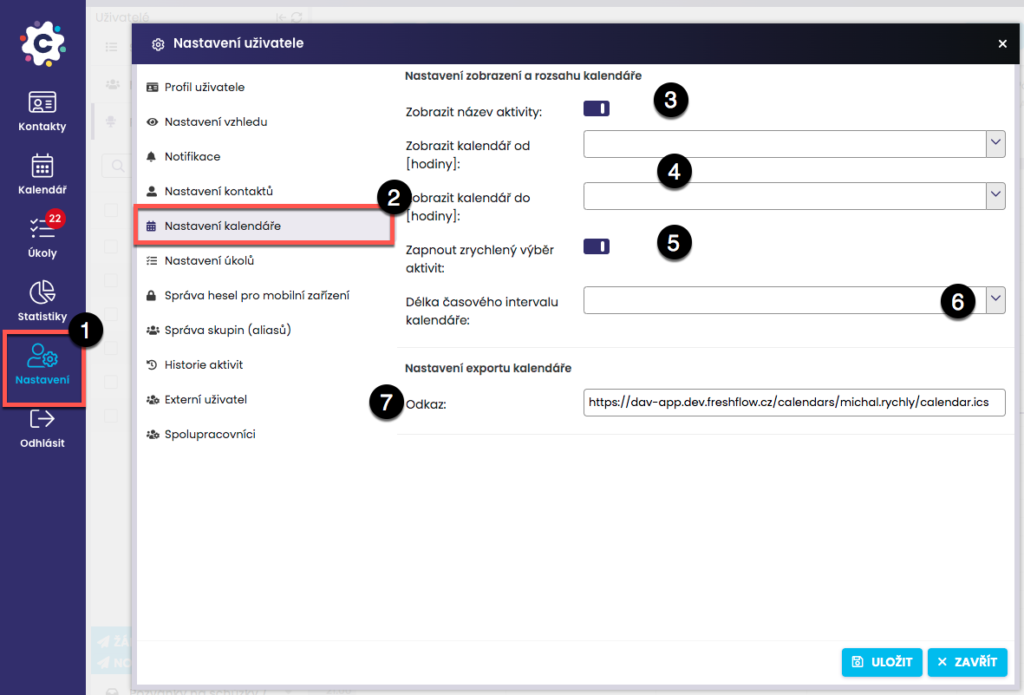
Setting / changing the time of calendar ie. from when to when you enter activities in Settings (1) > Calendar Settings (2).
Choose whether you want to view the name of the activity (3).
Set the time range of your calendar view (4).
Turn on the accelerated selection of activities (5) – we recommend keeping, faster input will offer you the most type of activity, respectively. task, and based on this, a window is created for entering an activity.
Length of the calendar time interval (6) – it is possible to select the display after 15, 30 and 60 minutes.
Link (7) – if you need to export your FreshFlow calendar to another of your calendars (e.g. google, outlook, etc.)
How to enter activities and their results?
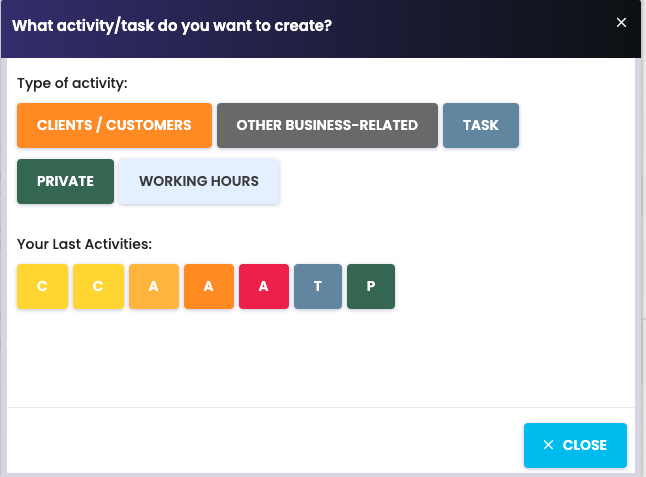
It’s easy to add a new event (activity) to Calendar. Click the day and time for which you want to schedule the new event. A dialog box will appear in which you will first fill in what kind of activity you want to enter into the calendar (you will see a menu according to the scope you have set).
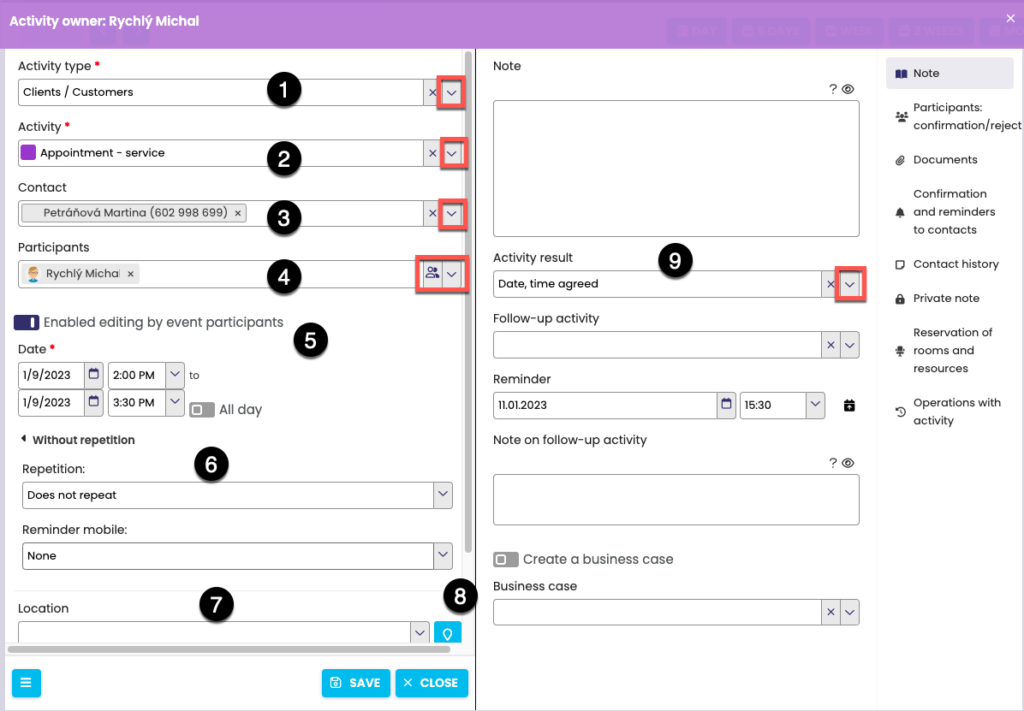
1) The type of activity is pre-filled from the previous step, but it can also be adjusted in this step by expanding the arrow.
2) In the Activity menu, select a specific activity (phone call, meeting, etc.)
3) Here it is possible to assign to an activity or enter a new contact, which will then be kept in the history together with others. For certain types of activities, this field does not occur.
4) By adding to the Participants field, you can invite colleagues to participate in the activity.
5) Tick the box to allow editing of invited participants in the activity, who will be able to edit the details of the activity.
6) Here you can set the repetition of the activity.
7) In the Meeting Location field, you can write a note about the location of the activity. If you enter a valid address, it will also appear on the map after clicking on the icon (8).
9) If the activity has already taken place, in this menu you select the corresponding result.
Data with a red asterisk are mandatory. Until they are filled, the activity cannot be saved.
If you know the name of the activity, then when you enter a new event, you can type the name directly in the Activity field.
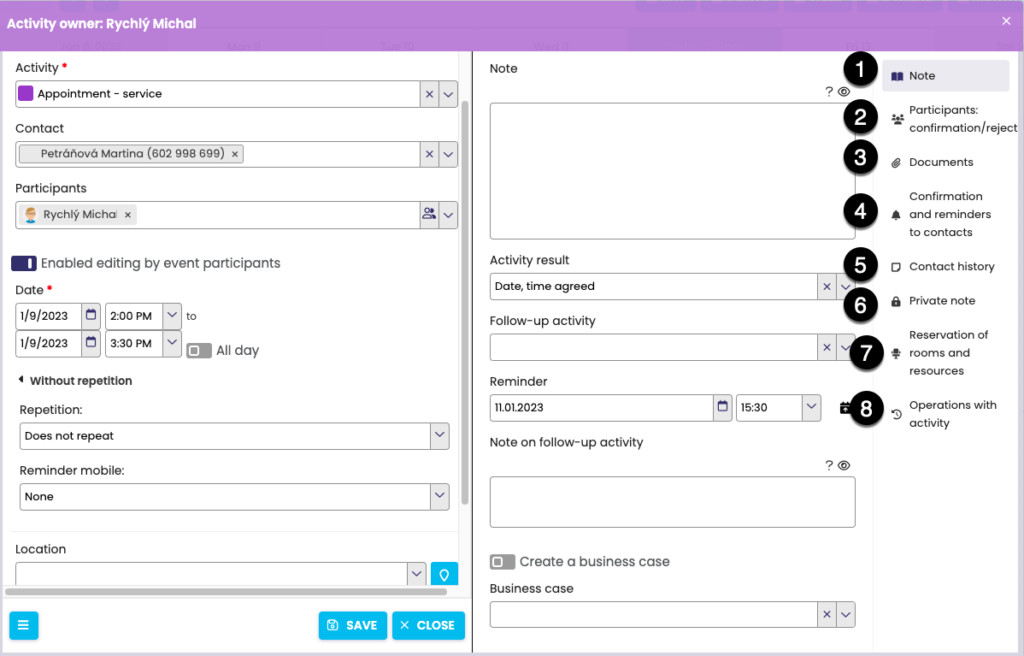
It is also possible to set other values via the menu on the right:
1) Note – here you can add any information to the activity, which will also be seen by all participants.
2) Confirmation/Rejection Participants – you will see a list of invitees to the event and their responses
3) Documents – add a document to an activity or contact.
4) Confirmation and reminders to contacts – automatic SMS or e-mail
5) Contact history – Activities / tasks with the contact
6) Private note – only you will see this note.
7) Reservation of rooms and resources – here you can request the reservation of a room / resource (e.g. projector) for your activity.
8) Activity operations – edit history of the activity, you can see who, when and how edited the activity.
How to invite to share calendars?
Invitation to share your calendar
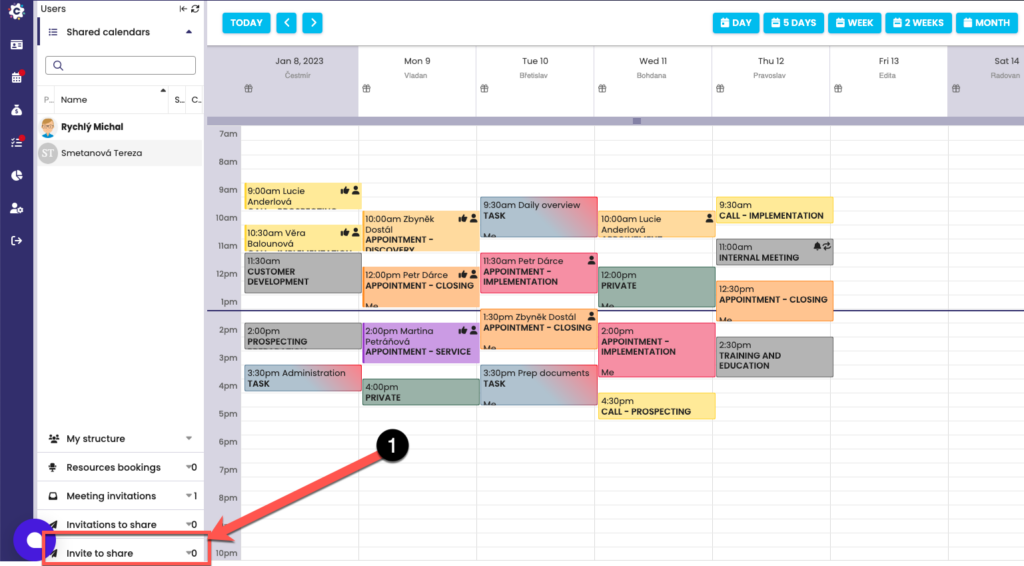
To create a Sharing Invitation, click the Send Sharing Invitation button (1) to open a new dialog box.
Create a calendar sharing invitation
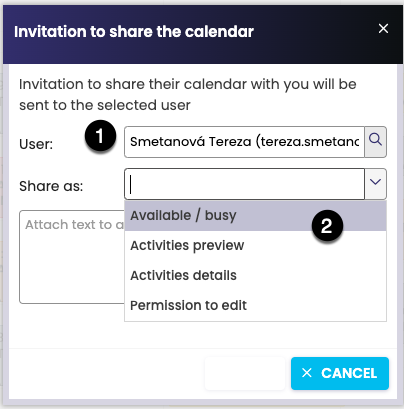
In the dialog box, fill in the necessary information to specify the User to whom the Invitation to Share will be sent. Select the name of the User (1) to whom you will send the Invitation. Choosing a sharing level is very important to set how the person who receives the Sharing Invitation from you will see your calendar.
Four levels of calendar sharing are possible (3):
– Free / Busy
– Activity preview
– Activity details
– Permission to enroll
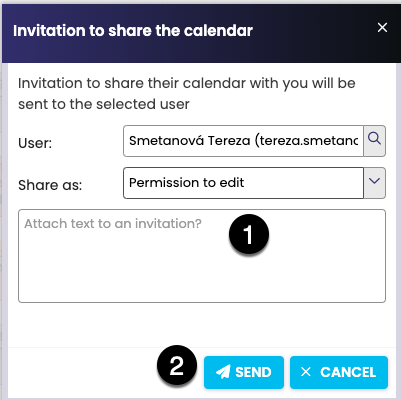
You can also attach a short text (1) to the Invitation, for example, to justify why you are sending the Sharing Invitation to the User. Click Send (2) To send the invitation to the selected User.
How to send meeting invitation?
Send a meeting invitation
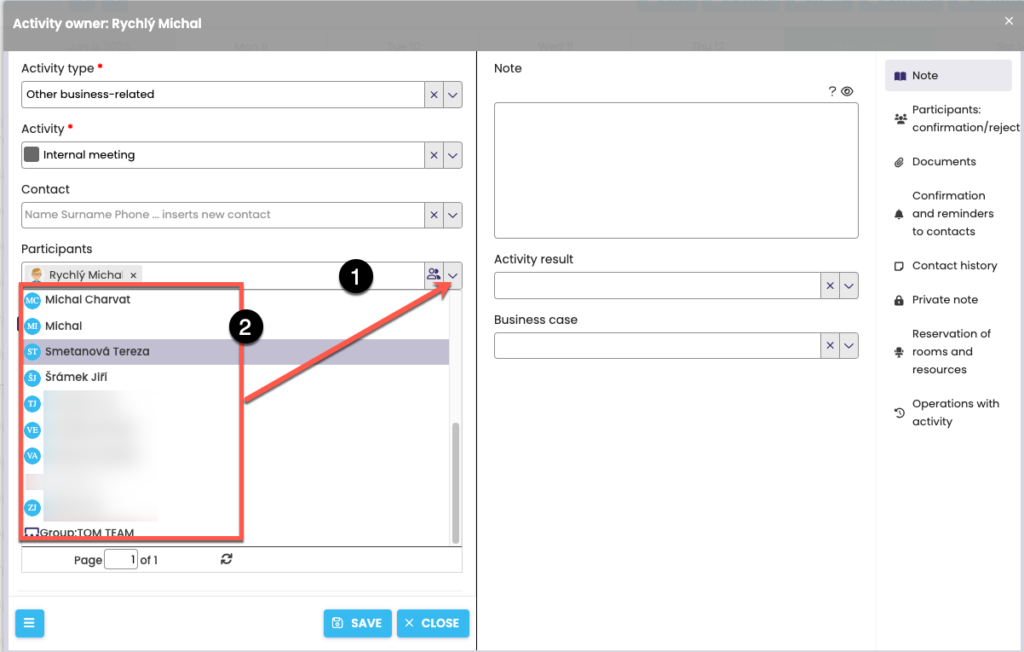
To send the invitation, it is necessary to add the name or names to the Participants. As soon as you start typing the name of the collaborator (1), the system will offer you a list from which you can select a name (2). Alternatively, in the right corner of the Participants box, click the arrow that activates the drop-down list with colleagues.
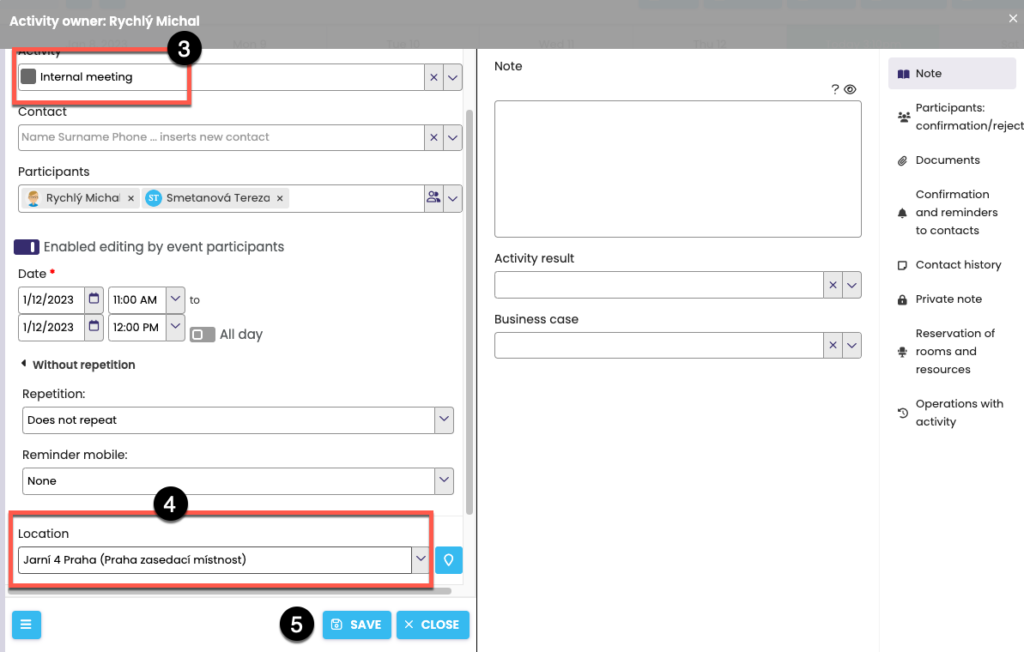
After completing The Activity (3), notes, Places (4) and other information, click Save (5). The invitee receives an invitation and it appears in the Meeting Invitations tab.
Announce a meeting invitation
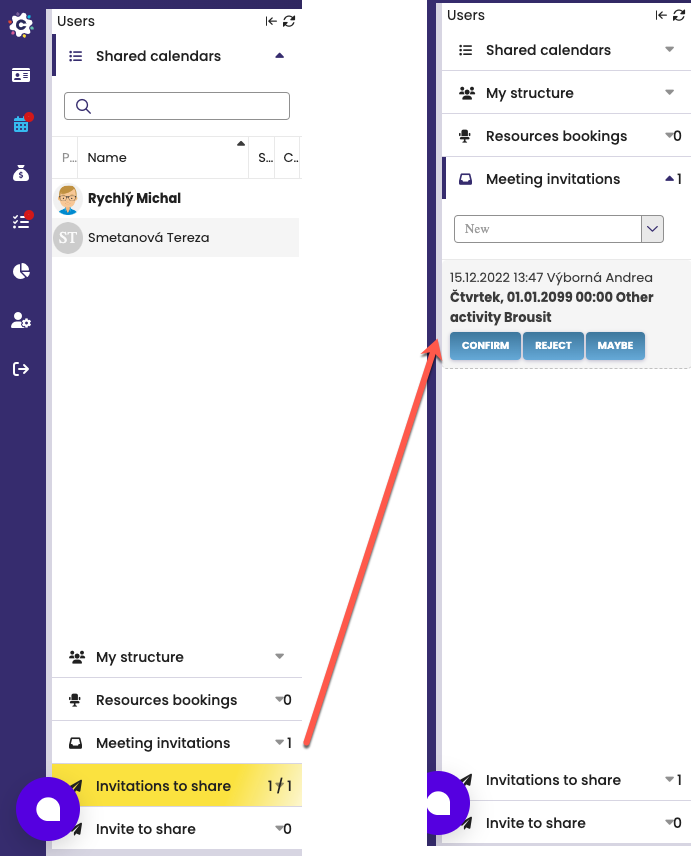
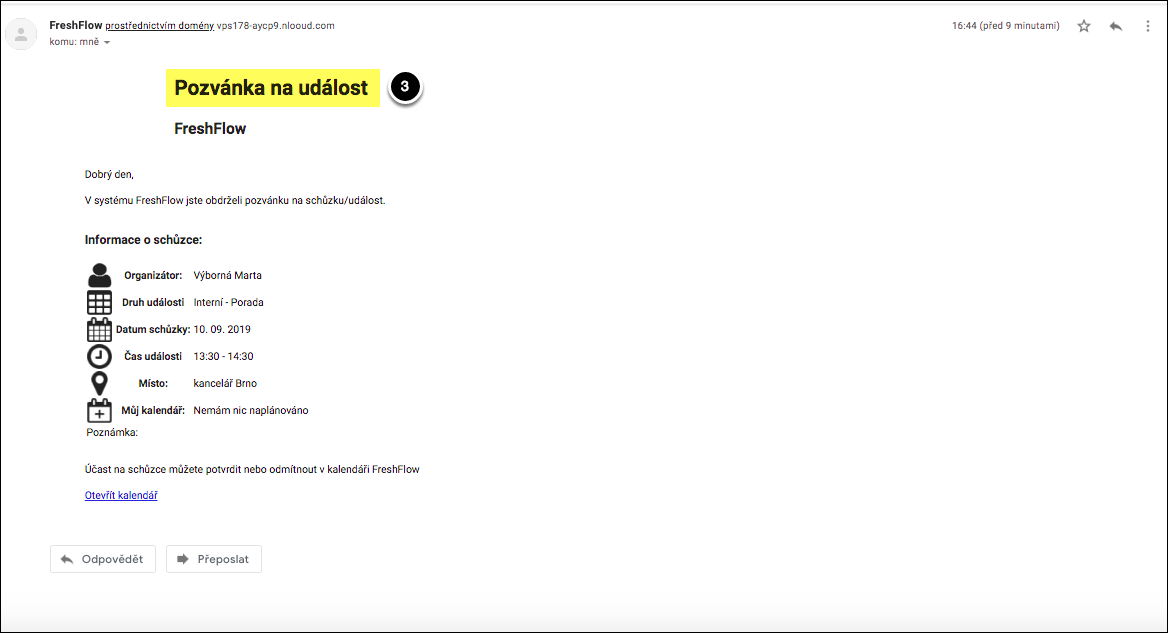
The incoming meeting invitation appears in the Meeting Invitations tab (1). In the event that this tab contains a new invitation, it changes its color (to turquoise) to draw attention to the invitation waiting to be processed. Click to open the tab and detailed information about the invitation will be displayed (2). The system also automatically sends a meeting invitation to the participants, including information to their email (3).
Confirm/decline a meeting
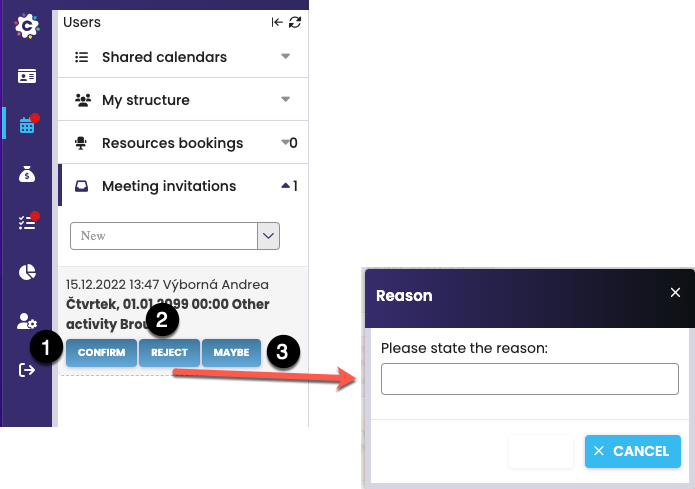
The invitation can be accepted by clicking on Confirm (1) or rejected (2). And if the event is well in advance (more than a day), the option “Maybe” (3) will also be offered.
If you refuse to participate, you will be asked to enter a reason for the refusal (4).
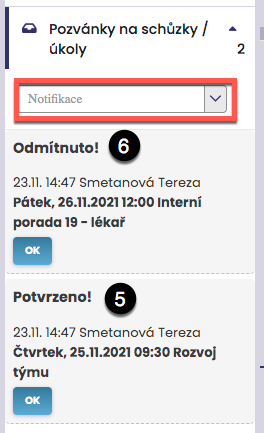
Once you confirm/decline the invitation, the invitee (i.e. the meeting organizer) will receive either an acknowledgement of acceptance of the invitation (5) or a rejection with the stated reason (6) in the Meeting Invitation.
How to receive a calendar sharing invitation?
Learn how to receive a Calendar Sharing Invitation
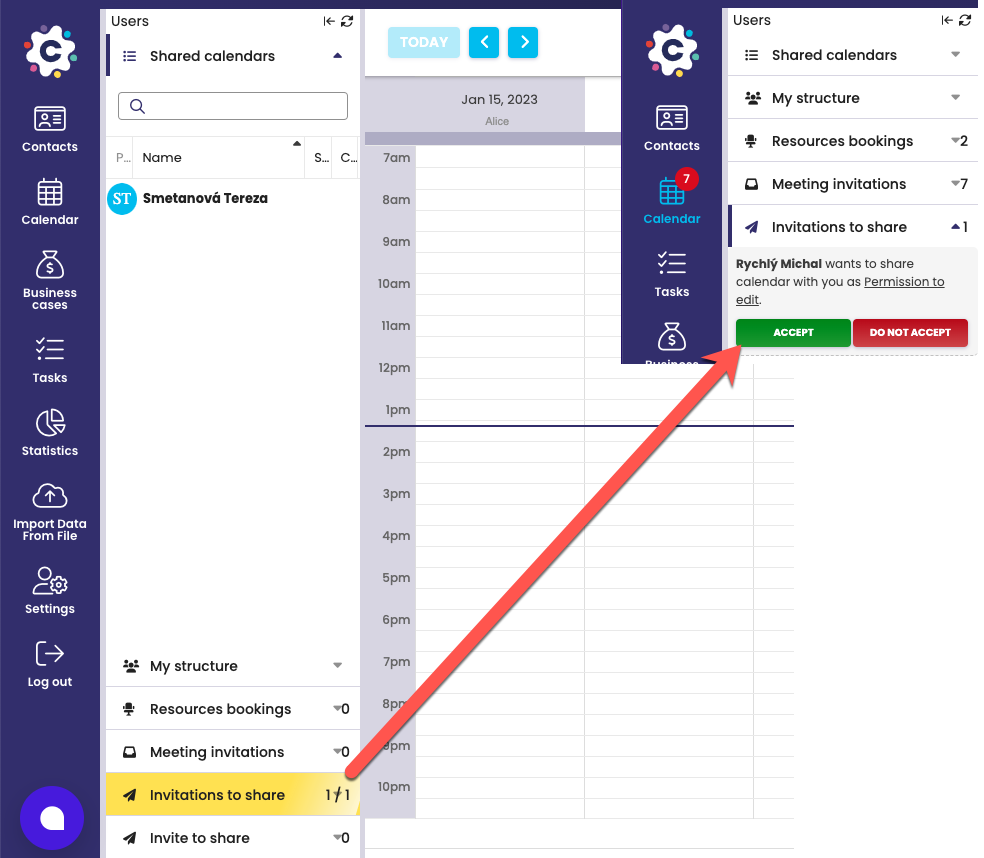
Information that you have received an Invitation to share a calendar with your colleague can be found in the calendar module in the Sharing Invitations tab (1). The Invitation (2) describes in detail who sends you the Sharing Invitation and how they want to share their calendar with you. That is, how you will see his calendar and a suggestion of how you can share your calendar with a colleague. By default, the same level of sharing of your calendar is set as the person wants to share their calendar with you.
Confirm a calendar sharing invitation
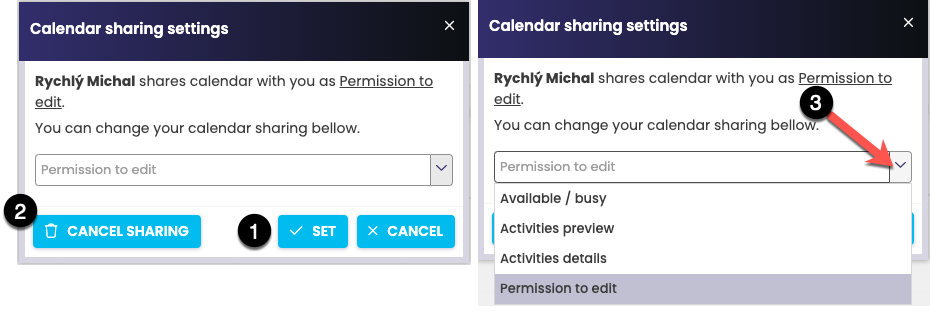
By default, the same level of sharing of your calendar as the person wants to share their calendar with you is set for confirmation, in this case Allowing enrollment. If you agree to this type of mutual calendar sharing settings, click set up (1) to confirm. This sets up and activates mutual sharing.
If you do not agree with the proposed mutual sharing of the calendar, you can completely refuse to share with each other by clicking the Cancel Sharing button (2). The system will ask you to confirm if you really want to unshare your calendar with this user. Click Yes to confirm. This will cancel the sharing with each other.
It is also possible to set a different level of sharing (3) of your calendar, such as Activity Preview type and click Set to confirm. In this case, you will see your colleague’s calendar as Free/Busy and they will see your calendar as Activity Preview.
Decline a calendar sharing invitation
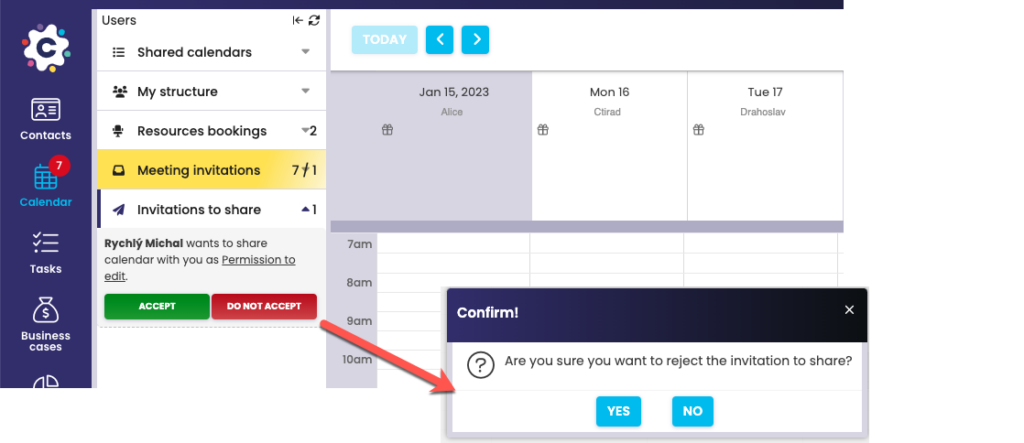
You can decline a sharing invitation directly from the Sharing Invitations tab by clicking DO NOT ACCEPT. The system will ask for confirmation if you will really accept the Sharing Invitation, which you can confirm by clicking Yes. Rejecting an invitation does not activate mutual sharing, so you will not see the calendar of the person who sent you the Invitation and they will not see your calendar either.
How to create rooms and resources for reservation?
Reserve resources
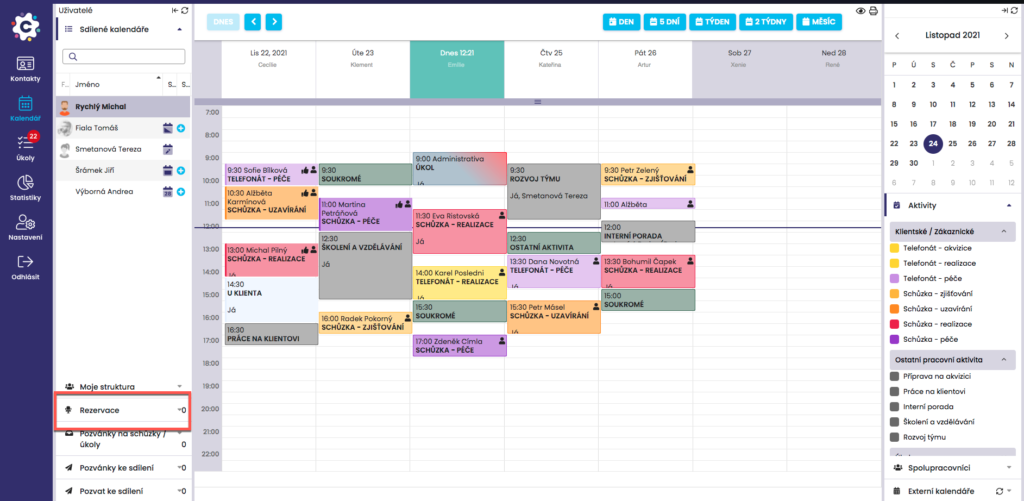
Reservation of rooms/resources can be found in the Calendar module in the left column under the Reservations tab.
Create a room/resource for reservations
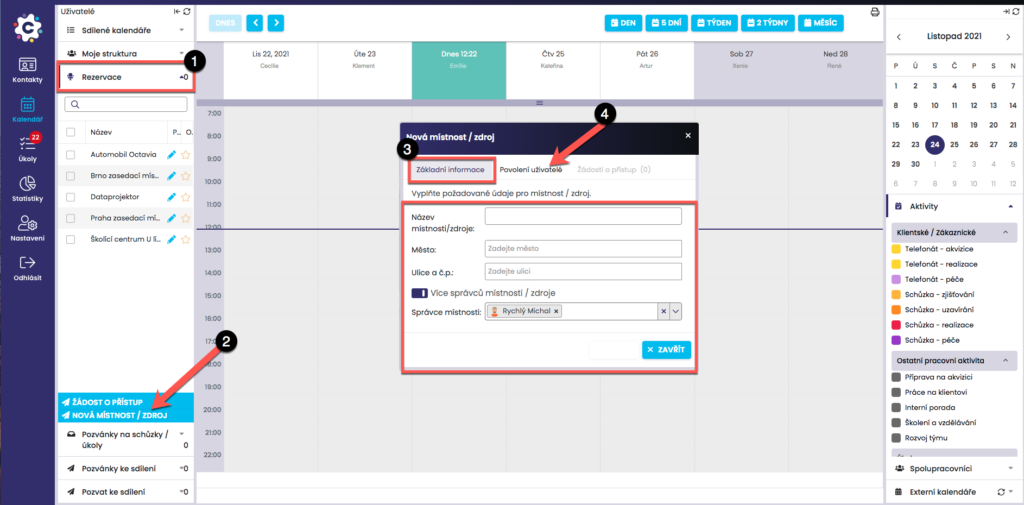
Creating a feed is very easy. Click to open the Reservations tab (1). After expanding the tab, click New Room (2). A new dialog box will open where you can define a new room/resource in the Basic Information tab (3) by entering the required data (City, Street and Number and Name of the room/resource). The name of the room/resource is very important, because under this name the resource will be displayed in the list of sources. Therefore, we recommend that you carefully choose the name that will specify the source the most, for example, TOKOVO 7. floor – green one, or Ruby House, jan Novák office.
You can also use resource reservations to reserve data projectors or roll-ups. In this case, write in the name of the source, for example, Dataprojector – Michal Rychlý.
If you have basic information about the Resource set, click on the Allowed Users tab (4), where it is necessary to define which users will be able to make reservations for this room/resource.
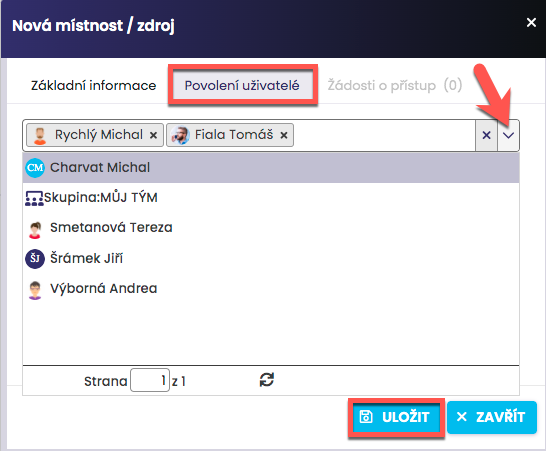
On the Allowed Users tab, define which users have the right to make reservations for the given room/resource. You can enter individual people by typing Surname and First Names in the box or use a preset or created group (alias).
To confirm the settings, click the Save icon.
How to make a room or resource reservation?
Make a reservation
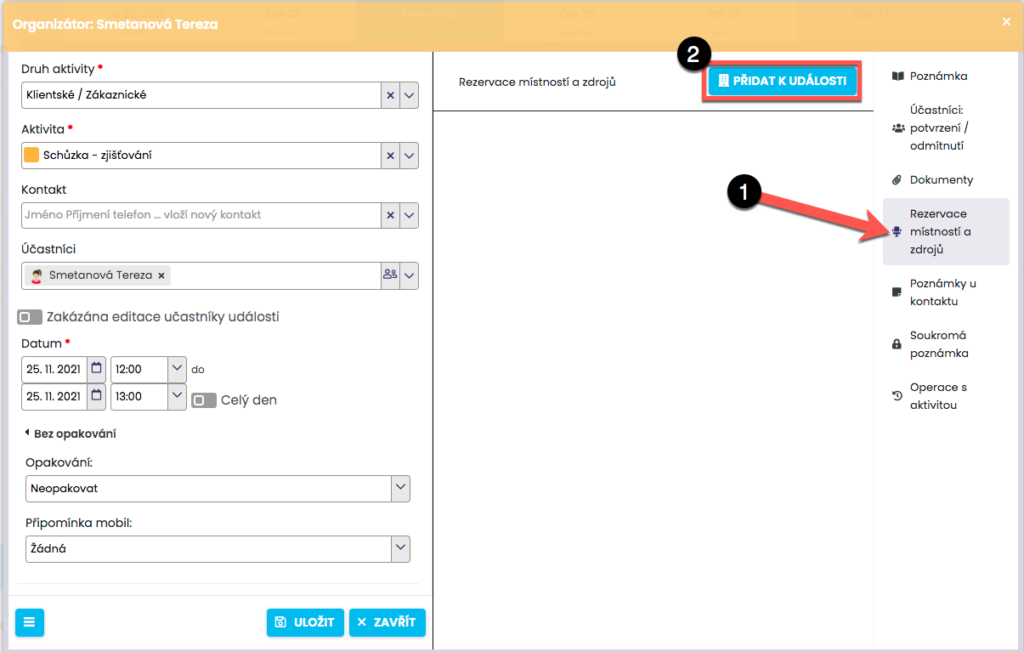
It’s very easy to make a reservation. When entering an activity in the calendar, click Room and Resource Reservations on the right (1), then Click Add to Event (2).
In the new dialog box you will see a box for finding a suitable room/resource for your event.

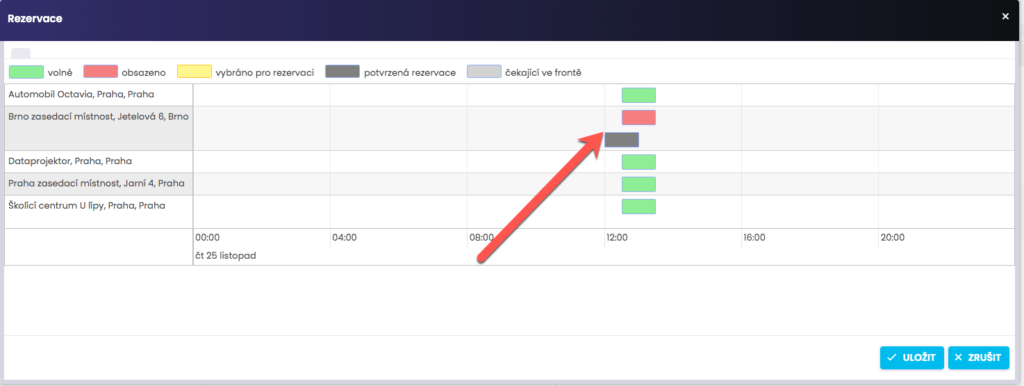
In the reservation dialog box, you will see rooms with a free date at the time of the event (marked in green) (3). Click on the green rectangle in your desired room/resource > it will turn yellow (4) > proceed to “Save” (5).
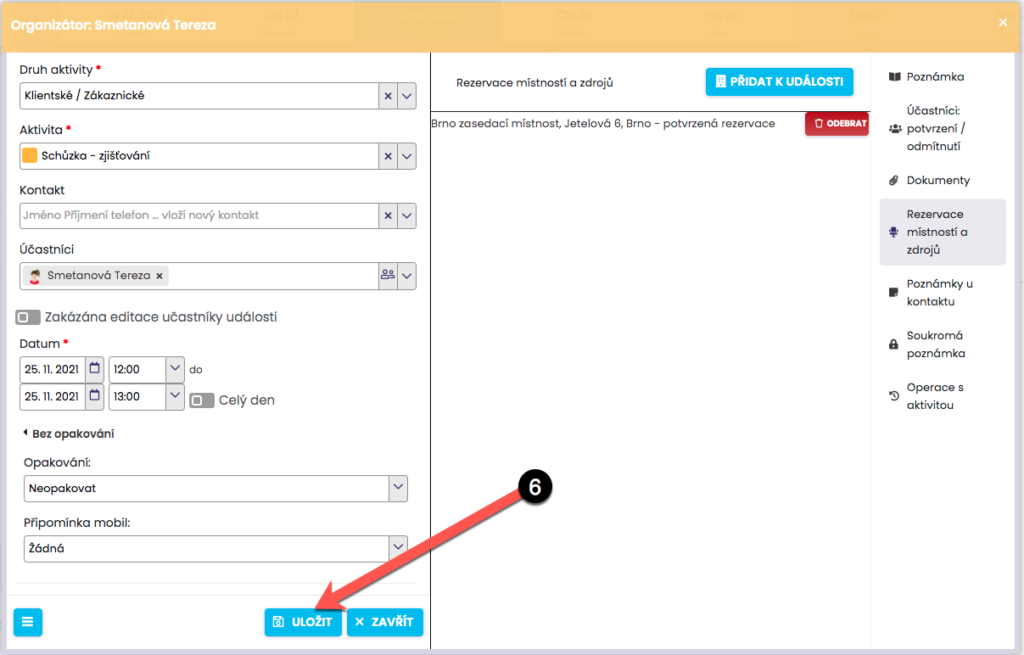
Once confirmed, the room/resource added to the event will be displayed. Click Save (6) to confirm your reservation. Multiple rooms/resources can be added to a single event.
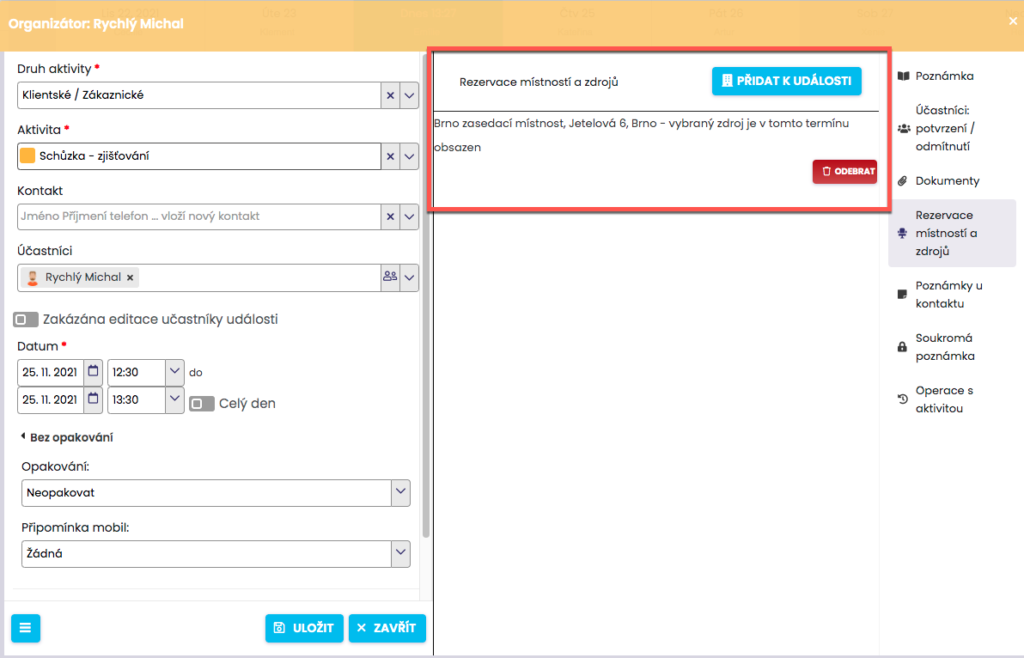
The room / resource is already occupied
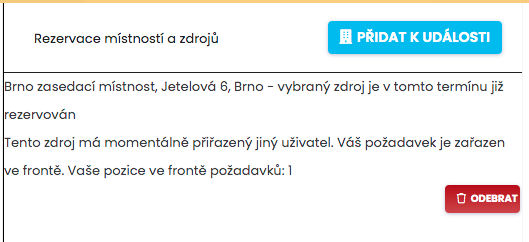
If the selected room/resource is already occupied for the given date, you will see a red window at that time. If you still add a reservation, you’ll see information that you’ll be queued. If a room/resource becomes available, a reservation is automatically created.
You can remove a reservation or a reservation in the queue at any time for an event.

Use the icons next to each activity to get a perfect overview of which activities you’ve created room/resource reservations for. A black chair (1) means that the reservation is confirmed and is valid. If the chair is grizzled for an activity (2), the reservation for this activity is queued. If the room/resource becomes vacant, the status is automatically updated and a black icon is displayed.
Tip: If you are looking for a new date for a meeting, you do not need to switch between the preview of the room/resource calendar and your calendar to find a free date for you and in the room/resource. If you have entered a reservation for your chosen room/resource for an activity, just move the activity by dragging the mouse to your free date in the calendar and the icon about the status of the reservation will immediately inform you whether your chosen room/resource is free for the given date (a black icon will be displayed). If the reservation cannot be confirmed, i.e. the room or resource is not available for the desired date, the activity will not be moved to a new date and you will be informed by a message from the system. To queue for a reservation for a given date and room, remove the reservation from the activity, move the activity to a new date, and then create a new reservation.
Request access to a resource

If the manager creates a room/reservation resource and you do not have access to it, you can request access to the room/reservation source by clicking Request access (1). In the new dialog box (2), select the City and Street where the room/resource of the reservation is located, and in the Resource field, select the offered rooms/resources. To confirm your request, click Submit Request.