APPLICATION DAVx⁵ (paid) – source Google Play
The first option is to install the paid DAVx⁵ app from Google Play. After the installation is complete, continue by launching the application. For the next procedure, you can skip to Create an alice password .
DAVx⁵ app (free) – source F-Droid
The second option is to get a free DAVx⁵ using the F-Droid app (i.e. an alternative source of Android apps). If you choose this procedure, then you can proceed by downloading and installing the application.
Installing DAVx⁵ from F-Droid


After tapping on the link in the email on your mobile / tablet or entering the https://f-droid.org/en/packages/at.bitfire.davdroid/ into the browser on your mobile / tablet, tap Download APK (1) to continue. Next, tap INSTALL (2).

To confirm the installation, tap Install (3). Subsequently, the necessary DAVx⁵ application is installed.
Check DAVx⁵ application permissions


After the DAVx⁵ application installation is complete, check the application’s permission settings. Tap Phone/tablet settings and here tap Apps (1). Locate DAVx⁵ and tap the arrow icon (2), then tap the arrow icon next to Permissions (3). Check and, if necessary, enable permissions for Calendar, Contacts, or Calendar, or Contacts. Your location (4), then tap the comma icon next to Other permissions (5) and check or enable read tasks and write tasks (Calendee tasks module) (6).
Create a password for synchronization
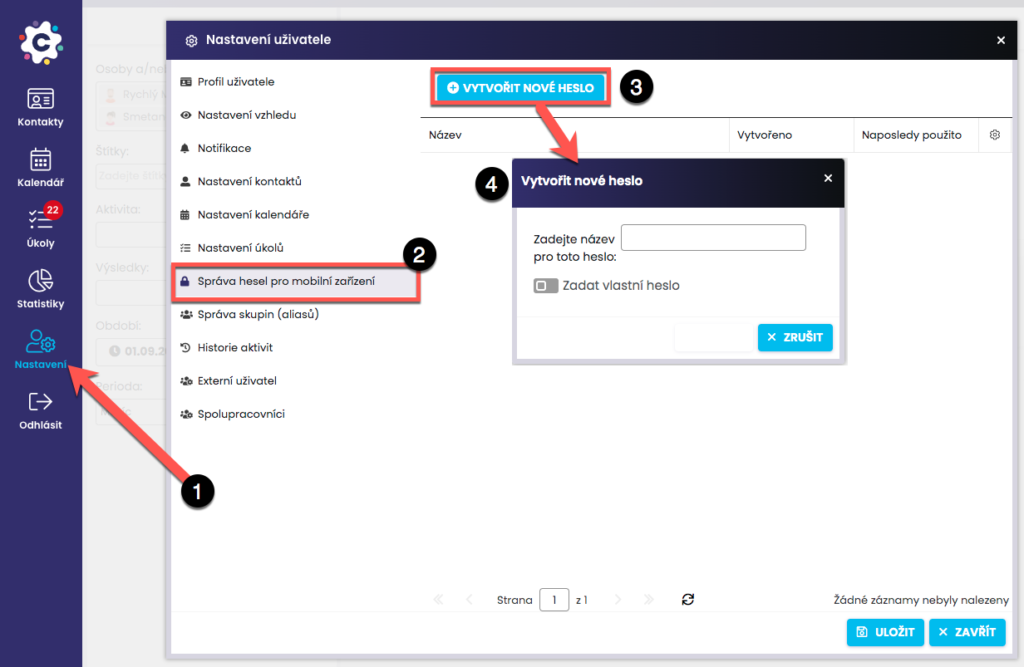
When you have the DAVx⁵ application installed and the permissions checked, you need to generate a synchronization password in Calendee. Open User Settings (1), click Manage Passwords for Mobile Devices (2) and click Create New Password (3). A dialog box for connecting a mobile device (4) opens.
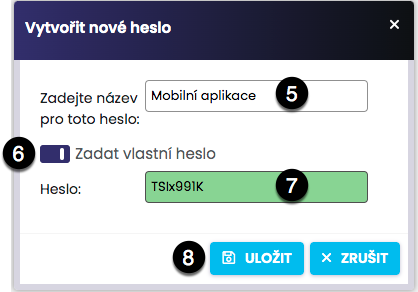
In the Create New Synchronization Password dialog box, type a password name (5). If you wish to create a custom password, then choose “Enter Custom Password” (6) and enter the password (7). The color of the “Password” field changes depending on the strength of the password. Red means a weak password. The color of the “Password” field should always be GREEN before saving.
Finally, click on Save button (8).
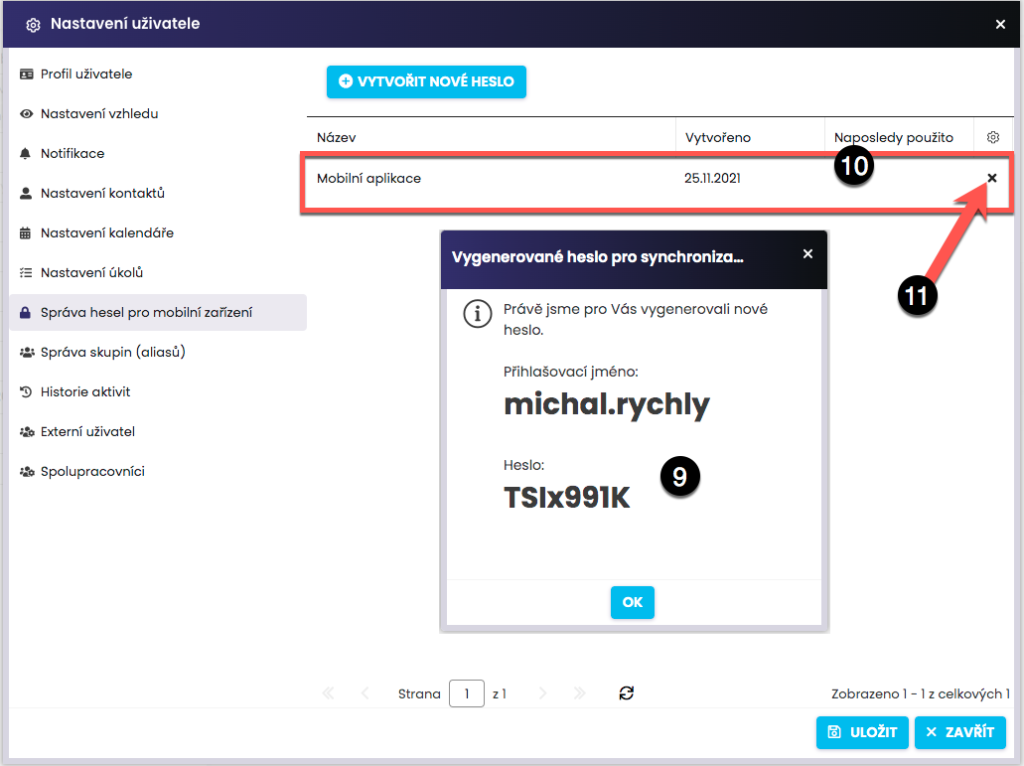
When you click on the button Save, a window will appear with a generated or custom password (9), which you can keep displayed or make a note of. For security reasons, the password cannot be displayed again after closing the window (by clicking OK). If you sync multiple devices, you can generate a new password for each device or use one of the same. All passwords stored in the list (10) are active.
If, for example, your phone / tablet has been lost, you can simply cancel the synchronization by deleting the used password by clicking on the blue slice (11). Also, if you lost your password and need to set up sync again, just delete your old password and generate a new one.
Create a sync account

To set up sync, open Settings (1) on your phone/tablet.

In Settings, search for Accounts (2) and tap Add account (3).

Select DAVx⁵ (4) from the menu.

Select Login with URL and username (5).
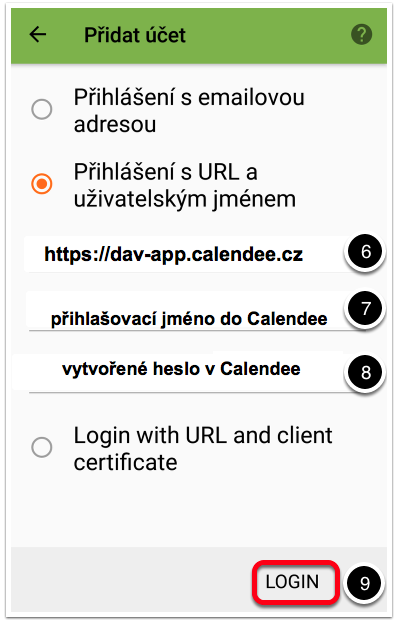
You will be prompted to enter values in the Server (6), Users (7) and Passwords (8) fields.
Server: https://dav-app.calendee.cz
User: Calendee login
Password: Your created password see. Synchronization password
After entering, tap Login (9).

When this page appears, check your email address (10), then tap Create account (11).

When this page appears, click DAVx⁵ (12).

The synchronization account set up will open and tap Manage accounts (13).

The synchronization account is created and now you need to set it up correctly. To set it up, tap your login name (14).
Set the subject of synchronization


After entering all the data, Android will connect with the Calendee server and offer the options to be synchronized. Select Address Book contacts (1) and select all calendars with the activity name (Contact Client, Training…) from Calendars (2). Alternatively, a calendar with your colleague’s name, if you wish to have a preview of their calendar directly on your mobile (3). If you wish to synchronize your Tasks from Calendee to your mobile, also select Tasks for Me and Tasks from Me (tasks.for me and tasks.from.me) (4).

If at any time later a new calendar will be added in Calendee eg. new activity, then tap on the menu (three vertical dots at the top right) in CALDAV, then on Refresh calendar list (5) and the new calendar will be added to the menu, check it to set it for synchronization.
Set up automatic sync

Tap “gear” in the upper right corner (1). Your Account Settings appear.


Now tap each option (2) and set the Interval in which Contacts, Calendar and Tasks should be synchronized. We recommend that you keep your data up to date as soon as possible (3). Below in the Settings window, you can also set a time limit for old events.
Alternatively, you can synchronize manually at any time.
Perform manual synchronization

For manual (instant) both-sided synchronization of Calendar, Contacts and Tasks with Calendee, tap Settings (phone/tablet) and then Accounts. Tap the arrow next to DAVx⁵ (1).

For instant synchronization, tap Synchr.all (2). Repeat the steps for DAVx⁵ Adress book.
Working with contacts


Open Contacts (1) on your phone. In the Contacts tab you will see your contacts (2). Tap “+New contact” to add a contact (3). If you tap “Next” (4), then in Display Preferences you can select whether you want to display only contacts from Calendee (DAVx⁵ Address book) or from your phone, Google and other sources.
Enter a new contact


After tapping “+New contact” in the newly opened Select account window, tap DAVx⁵ Address book to enter the contact that will be synchronized to Calendee (1). In the New Contact window, ALWAYS enter First Name Last Name and Phone Number (2). After tapping Add more fields (3), you can enter Address, Nickname (e.g. senior, junior…) and other details (4). To save a new contact, tap OK (tick icon) (5). To cancel, tap the X icon (6).
Edit a contact

Tap the contact you want to edit to open and tap Edit. In the Edit Contact window, change the details (1), tap OK (2) to save your changes. To cancel the changes, tap X (3). When editing a contact, you can see the DAVx⁵ Address book information and your account name, which means that the contact is synchronized with Calendee (4).
Working with the calendar

Open Calendar on your phone.
View your weekly calendar

After synchronizing the data with Calendee, your activities will be displayed in the calendar in color, identical to the Calendee calendar. In the Calendar menu, select which activities you want to see (2), add a New activity by tapping “+New event” (3) or tapping an open space in the calendar.
Enter a new activity


When entering activities in the calendar, we recommend that you type the type of activity in the Name (1), such as Client Phone Call. Next, you can add in the place (2), the duration of the activity (3). After clicking Next, you can select from the options to repeat the activity (4) whether you want your mobile to notify you of the activity (5). The most important thing is to SELECT THE RIGHT CALENDAR (6) to insert the activity into. If you want activities to be color-coded, you must always select the appropriate calendar for that activity. For example, for Call to a client, select the Calendar Phone Call Client, etc. You can then add a note (Description) to the activity (7) and confirm the activity by tapping the OK button (check mark in the upper right) (8).
Edit and delete your activity

When you tap an activity in Calendar, the activity details are displayed. Tap Edit (1) to edit the activity. To delete an activity, tap Delete (2).
Activity entered/edited on your phone/tablet will only appear in the Calendee calendar after you have synchronized the data, which may take a while, and reloaded the Calendee calendar, which can be done, for example, by moving the calendar forward and backward a week.
Looking at your colleagues’ calendar


In the CalDAV synchronization system, you have the option of viewing the calendar via mobile / tablet to the collaborator with whom you have set up calendar sharing. You’ll have access to collaborators’ calendars that you have in the Collaborators tab in Calendee and whose calendars you sync on your phone/tablet. You can get a collaborator’s calendar to the Collaborators tab by dragging the mouse from the Shared Calendars tab in Calendee (see Calendee). instructions here).
You can see your coworkers’ calendars in Your Mobile Phone Calendar by clicking Menu (the three horizontal lines in the top left) (1) and checking the calendar (2). Then you will see a collaborator’s calendar under the appropriate color. There is no longer the possibility of color differentiation of activities. This is just a monochrome preview of this calendar.
Work with tasks


In addition to your contacts and calendar, you can also sync tasks from Calendee to your phone. To synchronize them, you need to install an application that supports CalDav synchronization. For example, Tasks (Open Tasks) can be installed using F-droid (the same procedure as for DAVx⁵).
When you tap on the Tasks application (1), you will see Tasks from me and Tasks for me synchronized with Calendee (2). For example, when you tap Tasks for me (3), your to-do list (4) will be displayed. Tap “+” to enter a new task (5).
Enter a new task

After tapping the “plus icon” in the new window, select whether the Task is for you or for a colleague (1) > enter the task name (2) > The beginning and end of the task and other data (3). Click Save (4) to save, and after the data is synchronized, the task will be displayed in Calendee.
Editing a task

After tapping on the selected task and in it on the pencil icon (1) you can change/add task data. To save your changes, tap Save. Tap OK (2) to mark the task as completed.
Troubleshooting and FAQ
| Difficulties | Solution |
| Installation of F-Droid /DAVx⁵ from F-Droid has been blocked (Your phone is set up to block the installation of apps from unknown sources for security reasons.) | On your mobile, > Enable Unknown sources > Settings > Advanced settings > > security. You will be able to install applications from sources other than Google Play. |
| When installing DAVx⁵, the message “.. unknown error.” | On your mobile, > Settings > Memory and storage > check if you have enough free space and, if necessary, free up space, for example. by deleting photos. |
| CalDAV or CardDAV service cannot be found | In DAVx⁵ > Add account > Login with URL and username > check that in “Base URL” you have entered https://dav-app.calendee.cz that you enter your name and password correctly |
| Message “No contacts” | In Contacts, > the three vertical dots at the bottom right > Display settings > check the DAVx⁵ Address book checkbox. |
| Calendar doesn’t sync | Follow the checklist here. |
| Contacts aren’t syncing | Follow the checklist here. |
| Not syncing Calendar, Contacts to Huawei, Xiaomi, Lenovo, Meizu, One Plus, Oppo, Vivo | Follow the steps see. https://www.davx5.com/faq/synchronization-is-not-run-as-expected/ |
| An error is displayed (error message) | In this case, to speed up the resolution, you can send a DEBUG file for this error to Partners Office support. Create the file as described here. |
| How to set alerts for all calendar activities | On your mobile, tap Calendar > three horizontal lines at the top left > Settings > REMINDER SETTINGS > enable Notifications > then check/change the notification tone in Choose ringtone. |
| How to proceed when changing / getting a new mobile | 1. On your original mobile, open Settings > Bills > DAVx⁵ > Manage accounts > name.surname > ellipsis at the top right > Delete account. 2. In the new mobile, set up synchronization according to the instructions. |
| How to delete (cancel) synchronization | 1. Back up contacts. You do this on your mobile > Contacts > Another > Import/Export > EXPORT: Export to storage > EXPORT > Export contacts from > DAVx⁵ Address book > OK 2. Uninstall DAVx⁵. To do this, go to the DAVx⁵ > UNINSTALL application > settings>. |
| Notifications for events on Huawei do not work | 1. Make sure calendar notifications are turned on Phone Settings/Calendar > Notifications > Enable Notifications 2. Turn off data saving Phone > Administrator Transferred data > Smart Data Saver must be turned off |